Aye Mere Desi Foodies! Let’s Roll with Paneer Kathi!
Namaste, Salaam, and Sat Sri Akal, my beautiful people! Chef Curry Do’pyaza here, ready to tickle your taste buds with a dish that’s as versatile as a Bollywood actor and as comforting as a mother’s hug – the magnificent Paneer Kathi Roll!
This isn’t just food; it’s an emotion, a memory, a quick bite that can brighten even the dullest day. Think of bustling street corners during Diwali, the vibrant colours of Holi, or the joyous celebrations of Eid. You’ll find the Kathi Roll reigning supreme, a favourite amongst young and old alike. It’s the perfect grab-and-go treat during those festive times, a quick lunch, or a satisfying late-night snack.
A Little History Lesson (Without the Homework!)
The Kathi Roll, my friends, has its roots in Kolkata (formerly Calcutta). Legend has it that back in the 1930s, a popular restaurant called Nizam’s wanted to cater to British officers who found it difficult to eat kebabs with their hands. So, they wrapped the kebabs in parathas, and voila! The Kathi Roll was born. “Kathi” literally means “stick” in Bengali, referring to the skewers used to cook the kebabs. Over time, the fillings evolved, and the Paneer Kathi Roll became a vegetarian superstar!
Get Ready to Roll!
Preparation Time: 20 minutes
Cooking Time: 25 minutes
Ingredients – The Stars of Our Show:
- For the Paneer Filling:
- 200 grams Paneer (Indian Cottage Cheese), cubed into delicious bite-sized pieces
- 1 medium Pyaaz (Onion), finely chopped into tiny, perfect squares
- 1 medium Shimla Mirch (Capsicum/Bell Pepper), diced into colourful, crunchy pieces
- 1 inch Adrak (Ginger), grated into a fragrant pile
- 2-3 Lahsun (Garlic) cloves, minced into potent, flavourful bits
- 1-2 Hari Mirch (Green Chillies), finely chopped into fiery, little rings (adjust to your spice level, my friends!)
- 1 teaspoon Dhaniya Powder (Coriander Powder), for that earthy aroma
- 1/2 teaspoon Haldi Powder (Turmeric Powder), for a golden glow
- 1/2 teaspoon Lal Mirch Powder (Red Chilli Powder), for a spicy kick
- 1/2 teaspoon Garam Masala, for that warm, comforting hug of flavour
- 1 tablespoon Nimbu ka Ras (Lemon Juice), for a zesty tang
- 2 tablespoons Tel (Cooking Oil), for a smooth sizzle
- Salt to taste, because we all like things just right
- For the Paratha (Indian Flatbread):
- 2 cups Atta (Whole Wheat Flour), for that wholesome goodness
- 1/2 teaspoon Namak (Salt), just a pinch
- 1 tablespoon Tel (Cooking Oil), for a soft texture
- Water, as needed, to make a soft, pliable dough
- For the Assembling:
- Hara Chutney (Green Chutney), for that minty freshness
- Meethi Chutney (Tamarind Chutney), for that sweet and tangy delight
- Pyaaz (Onion) Rings, for that extra crunch and flavour
- Chaat Masala, for a final sprinkle of magic
Let’s Get Cooking! Step-by-Step:
- Dough Time: In a large bowl, mix the atta, salt, and oil. Gradually add water and knead into a soft, smooth dough. Cover it with a damp cloth and let it rest for at least 15 minutes. This allows the gluten to relax, resulting in softer parathas.
-
Paneer Power: Heat oil in a kadhai (wok) or pan over medium heat. Add the chopped onions and sauté until they turn a beautiful golden brown. Add the ginger and garlic, and sauté for another minute until fragrant.
-
Spice Symphony: Add the diced capsicum and green chillies. Sauté for 2-3 minutes until the capsicum is slightly tender. Now, add the coriander powder, turmeric powder, red chilli powder, and garam masala. Sauté for another minute, stirring constantly to prevent burning.
-
Paneer Paradise: Add the paneer cubes to the pan and gently mix everything together. Cook for 3-4 minutes, until the paneer is lightly coated with the spices and heated through. Be gentle, my friends, we don’t want to break the paneer!
-
Zesty Zing: Squeeze in the lemon juice and mix well. Taste and adjust the salt and spices as needed. Your paneer filling is ready!
-
Paratha Perfection: Divide the dough into equal portions and roll each portion into a thin circle (like a roti, but slightly thicker). Heat a tawa (griddle) over medium heat. Place the paratha on the tawa and cook for a minute on each side, until lightly browned.
-
Golden Touch: Drizzle a little oil on both sides of the paratha and cook until golden brown and crispy. Press gently with a spatula to ensure even cooking.
-
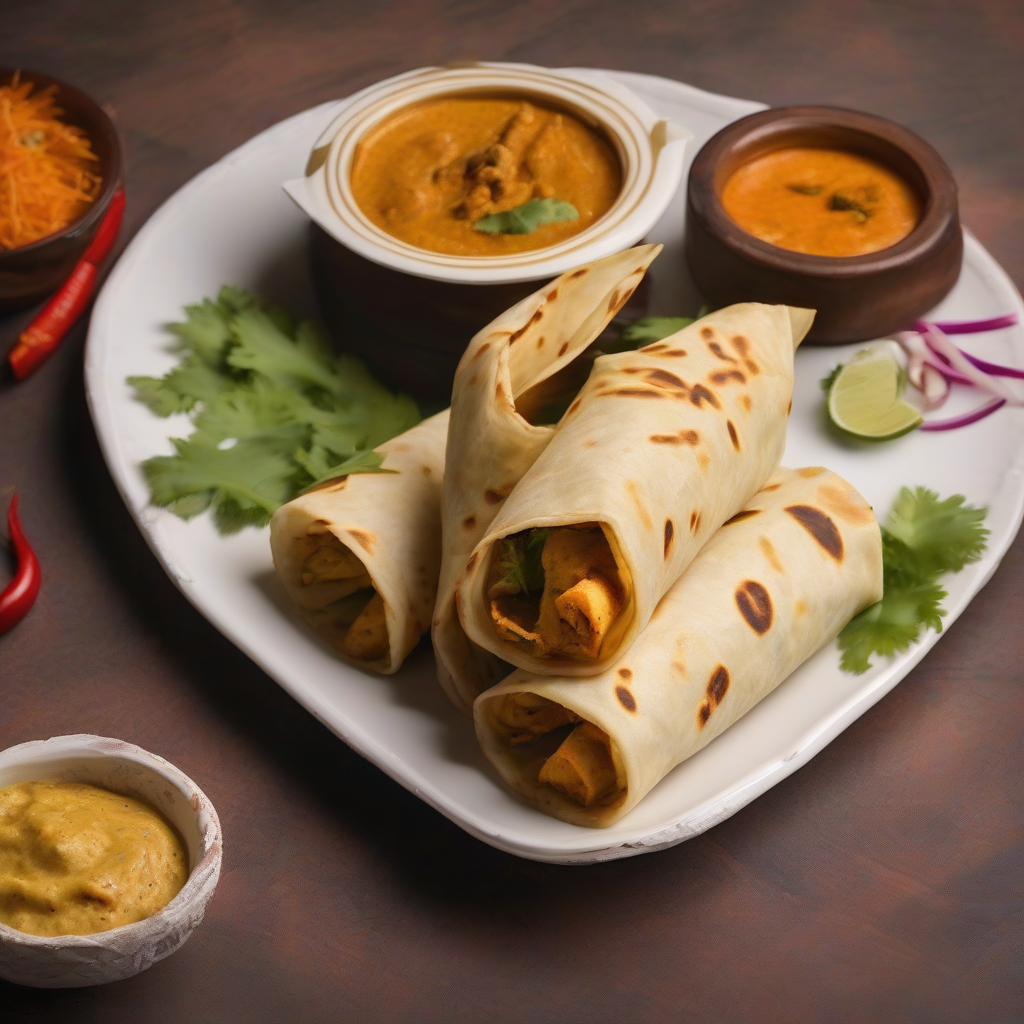
Roll Time! Place the cooked paratha on a plate. Spread a generous amount of green chutney and tamarind chutney over the paratha. Spoon the paneer filling onto the paratha. Sprinkle with chaat masala and top with onion rings.
-
Wrap it Up! Carefully roll the paratha tightly, like a burrito. You can wrap the bottom half of the roll with butter paper or foil to make it easier to handle.
-
Devour! Your delicious Paneer Kathi Roll is ready to be devoured!
Chef Curry’s Top Tips for Kathi Roll Glory:
- Paneer Power: Use fresh, soft paneer for the best results. If using store-bought paneer, soak it in warm water for 10-15 minutes to soften it.
- Spice it Up (or Down): Adjust the amount of green chillies and red chilli powder to your liking.
- Paratha Perfection: Don’t overcook the parathas, or they will become dry and brittle.
- Chutney Choice: Feel free to use your favourite chutneys! Mint-coriander chutney, garlic chutney, or even a simple tomato chutney would work well.
- Marinate Magic: For an extra flavour boost, marinate the paneer in a mixture of yogurt, ginger-garlic paste, and spices for 30 minutes before cooking.
Cooking it Your Way:
- Gas Stove: The recipe is primarily designed for a gas stove.
- Induction Stove: You can easily adapt the recipe for an induction stove by using compatible cookware.
- Oven: While not traditional, you can bake the filled rolls at 350°F (175°C) for 10-15 minutes for a slightly different texture.
- Air Fryer: You can also air fry the rolls for 5-7 minutes at 350°F for a crispy exterior.
Nutritional Information (Approximate per Roll):
- Calories: 350-400
- Protein: 15-20g
- Carbohydrates: 40-45g
- Fat: 15-20g
Note: These values are approximate and may vary depending on the specific ingredients and portion sizes used.
Serving Suggestions:
- Serve the Paneer Kathi Rolls hot, straight off the tawa.
- Pair them with a side of raita (yogurt dip) or a refreshing salad.
- Cut the rolls into smaller pieces for easy snacking.
- Pack them for lunchboxes or picnics.
Time to Get Rolling!
So there you have it, my friends! A simple, delicious, and versatile Paneer Kathi Roll recipe that you can easily make at home. Don’t be shy, get into the kitchen, experiment with the flavours, and create your own signature Kathi Roll.
Try this recipe at home and share it with your friends and family. Let me know how it turns out in the comments below. Happy cooking, and remember – khana banao, pyaar badhao! (Make food, spread love!)
Until next time,
Chef Curry Do’pyaza, signing off!